Day 18 : Build a Serverless Image Processing Project Using Terraform and AWS Lambda | #30DaysOfAWSTerraform
In this blog we explore how to build a serverless image processing application using AWS Lambda and Terraform, enabling you to process images automatically when they are uploaded — all without provisioning or managing servers.
Before diving into the project, it’s important to clearly understand what AWS Lambda is, why it’s powerful, and how it fits into a serverless architecture. Once that foundation is set, we’ll explore how Terraform helps us automate the entire setup.
Traditional Server-Based Approach
Before serverless services like AWS Lambda, applications were built using a traditional server-based model. In a traditional architecture, developers are responsible for managing servers—either on-premises or in the cloud using virtual machines like EC2.
Challenges with Traditional Servers
Server Management Overhead: You must manage OS updates and patches, security hardening, software installations and server failures and recovery
Manual or Complex Scaling
Higher Costs
Operational Risk: Human errors during configuration
Slower Development : Developers spend time on infrastructure instead of focusing on Business logic, Feature development, Innovation
Serverless architecture powered by AWS Lambda removes these limitations by shifting infrastructure responsibility to AWS.
What is AWS Lambda?
AWS Lambda is a serverless compute service that lets you run code without provisioning or managing servers. You simply upload your code, define a trigger, and AWS takes care of the rest — including scaling, availability, and maintenance.
With Lambda, you only pay for:
Number of requests
Execution duration
There is no cost when your code isn’t running, making it highly cost-efficient. When we say serverless, it doesn’t mean servers no longer exist. The servers are still there — but AWS manages them for us.
As developers, we don’t worry about:
Operating systems
Server patching and maintenance
Scaling infrastructure
High availability and uptime
Our responsibility ends with writing and deploying the code. Everything else is handled by AWS.
A Lambda function does NOT run all the time. Unlike traditional servers that are always running and consuming resources, a Lambda function runs only when it is needed.
What Triggers a Lambda Function?
A Lambda function is executed when an event occurs. An event is simply something that happens in your system that requires a response.
Common Lambda Events Include:

S3 Events
When a file is uploaded to an S3 bucket (for example, an image upload).Scheduled Events: Run code at a specific time, such as Every Monday at 7 AM ,Every night for backups or reports
System or Application Events
Events from:
API Gateway (HTTP requests)
DynamoDB streams
CloudWatch logs
Real-time application triggers
What Happens When an Event Occurs?
When an event happens, AWS Lambda follows this flow:
AWS automatically provisions compute resources
The Lambda function starts executing
The function processes the event
The execution finishes
Resources are released automatically
There are no idle servers and no wasted compute.
This event-driven execution model gives us several advantages:
Cost Efficiency: You pay only for the execution time, not for idle servers.
Automatic Scaling**:** If 1 event occurs, Lambda runs once. If 10,000 events occur, Lambda scales automatically.
High Availability by Default: AWS handles redundancy and fault tolerance across Availability Zones.
Simpler Architecture: No load balancers, no server health checks, no manual scaling rules.
Lambda Execution Duration: An Important Boundary
While AWS Lambda is powerful, it’s important to understand where it fits best.
Short-Lived, Event-Driven Workloads
AWS Lambda is designed for:
Executions that last a few seconds
Tasks that complete within a few minutes
AWS enforces a maximum execution time of 15 minutes for a single Lambda invocation. If your code needs to run longer than that, Lambda is not the right service.
This limit is intentional and helps Lambda remain:
Highly scalable
Cost-efficient
Event-driven
When Lambda Is Not the Right Choice
Lambda may not be suitable for:
Long-running batch jobs
Continuous background processing
Applications requiring persistent connections
Workloads that need hours of execution time
In such cases, services like EC2, ECS, or AWS Batch are better options.
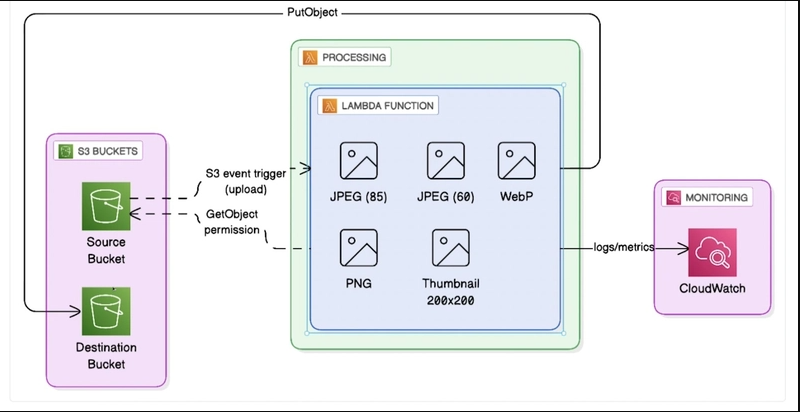
How This Applies to Our Project
In our image processing project:
An image is uploaded to an S3 bucket
The upload generates an S3 event
AWS Lambda is triggered automatically
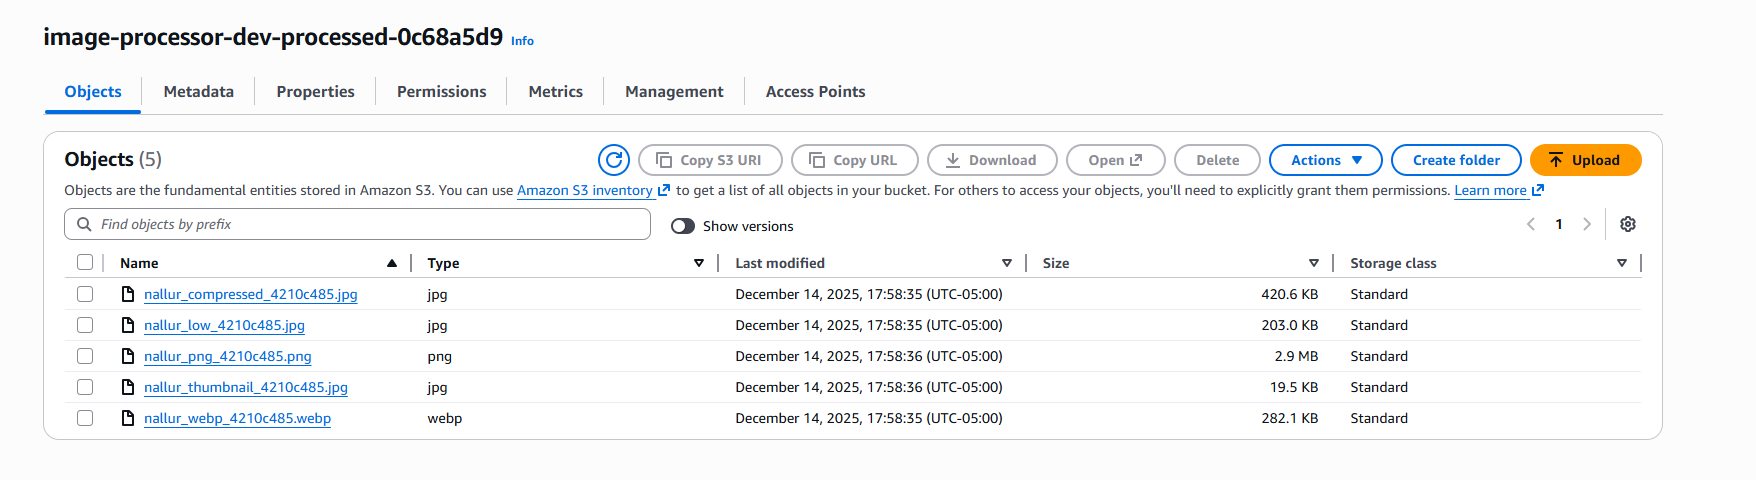
This Lambda function is where all the image processing logic lives. It will take the original image and automatically generate:
A JPEG image with 85% quality
Another JPEG image with 60% quality
A WebP version
A PNG version
And a thumbnail image resized to 200 by 200
The processed image is stored in another S3 bucket
The function exits once processing is complete
This makes the solution efficient, scalable, and truly serverless. No servers run continuously.No infrastructure needs manual scaling.
Dive Into Project Implementation
Now we will go through the code for the project execution.
Designing Unique S3 Bucket Names with Terraform
When working with Amazon S3, one important rule to remember is that S3 bucket names must be globally unique.
This means a bucket name cannot already exist anywhere in AWS — not just within your account or region.
Because of this constraint, hardcoding bucket names can easily lead to deployment failures, especially when:
Recreating infrastructure
Deploying across multiple environments (dev, test, prod)
Sharing Terraform code with others
To solve this problem, we use Terraform’s random_id resource to generate unique suffixes that ensure our bucket names never collide.
Using random_id for Uniqueness:
# Random suffix for unique resource names
resource "random_id" "suffix" {
  byte_length = 4
}
This generates a short hexadecimal string that is stable across Terraform runs unless the resource is recreated.
Creating a Consistent Naming Strategy
Instead of randomly naming everything, we follow a structured and readable naming convention.
Common Bucket Prefix
We first build a shared prefix using:
The project name
The environment (dev, stage, prod)
  locals {
    bucket_prefix = "${var.project_name}-${var.environment}"
  }
This helps clearly identify which project and environment a resource belongs to.
Separate Buckets for Uploads and Processed Images
For our image processing pipeline, we need two S3 buckets:
One for uploaded images
One for processed images
We generate both names using the common prefix and append the random suffix.
    locals{
      upload_bucket_name    = "${local.bucket_prefix}-upload-${random_id.suffix.hex}"
      processed_bucket_name = "${local.bucket_prefix}-processed-${random_id.suffix.hex}"

    }
Clear and Meaningful Lambda Function Name
Unlike S3 bucket names, Lambda function names only need to be unique within an account and region. Still, we follow a clean naming convention for clarity and maintainability.
 locals{
   lambda_function_name = "${var.project_name}-${var.environment}-processor"
 }
This makes it easy to:
Identify the function’s role
Associate it with a specific project and environment
Manage multiple Lambda functions at scale
Creating Secure S3 Buckets for Image Storage
Our image processing pipeline requires two S3 buckets:
One to store original uploaded images
One to store processed images
Both buckets are created with security and durability best practices enabled by default.
Source Bucket – Uploading Original Images
This bucket acts as the entry point for our pipeline. Any image uploaded here will trigger the Lambda function.
 resource "aws_s3_bucket" "upload_bucket" {
   bucket = local.upload_bucket_name
 }
Enable Versioning:
Versioning ensures that:
Deleted or overwritten files can be recovered
Accidental uploads do not permanently lose data
  resource "aws_s3_bucket_versioning" "upload_bucket" {
    bucket = aws_s3_bucket.upload_bucket.id

    versioning_configuration {
      status = "Enabled"
    }
  }
Enable Server-Side Encryption:
All uploaded images are encrypted at rest using AES-256, protecting sensitive data.
    resource "aws_s3_bucket_server_side_encryption_configuration" "upload_bucket" {
      bucket = aws_s3_bucket.upload_bucket.id

      rule {
        apply_server_side_encryption_by_default {
          sse_algorithm = "AES256"
        }
      }
    }
Block Public Access
This ensures the bucket is not publicly accessible, preventing accidental data exposure.
    resource "aws_s3_bucket_public_access_block" "upload_bucket" {
      bucket = aws_s3_bucket.upload_bucket.id

      block_public_acls       = true
      block_public_policy     = true
      ignore_public_acls      = true
      restrict_public_buckets = true
    }
Destination Bucket – Storing Processed Images
The processed images are stored in a separate bucket to:
Keep raw and processed data isolated
Improve security and organization
The same versioning, encryption, and public access restrictions are applied to ensure consistency and best practices.
    # S3 Bucket for processed images (DESTINATION)
    resource "aws_s3_bucket" "processed_bucket" {
      bucket = local.processed_bucket_name
    }
This guarantees both buckets are:
Secure
Encrypted
Private
Recoverable
Create IAM Role for the Lambda Function
AWS Lambda needs permissions to:
Write logs to CloudWatch
Read images from the upload bucket
Write processed images to the destination bucket
To enable this securely, we create an IAM role with a trust policy allowing Lambda to assume it.
resource "aws_iam_role" "lambda_role" {
  name = "${local.lambda_function_name}-role"
This role follows the principle of least privilege, granting only the permissions required.
Create IAM Policy for Lambda Permissions
We attach a custom policy to the Lambda role with three permission blocks:
CloudWatch Logging: Allows Lambda to create log groups and streams.
logs:CreateLogGroup
logs:CreateLogStream
logs:PutLogEvents
Read Access to Upload Bucket: Lambda can retrieve uploaded images for processing.
s3:GetObject
s3:GetObjectVersion
Write Access to Processed Bucket: Lambda can store the transformed images.
s3:PutObject
s3:PutObjectAcl
This fine-grained access ensures security without over-permissioning.
Lambda Layer for Image Processing (Pillow)
Image processing libraries like Pillow are too large to bundle directly inside the Lambda function.
To solve this, we use a Lambda Layer, which:
Keeps function code lightweight
Allows library reuse
Simplifies updates
resource "aws_lambda_layer_version" "pillow_layer" {
  filename            = "${path.module}/pillow_layer.zip"
  layer_name          = "${var.project_name}-pillow-layer"
  compatible_runtimes = ["python3.12"]
  description         = "Pillow library for image processing"
}
filename
Points to a ZIP file that contains the Pillow library and its dependencies.layer_name
Gives the layer a clear and readable name so it’s easy to identify in the AWS Console.compatible_runtimes
Ensures this layer can be used only with Lambda functions running Python 3.12.
This prevents runtime incompatibility issues.
Libraries like Pillow include native (compiled) dependencies. These cannot be installed dynamically inside Lambda at runtime.
Using a Lambda Layer allows us to:
Keep function code lightweight
Reuse dependencies across multiple Lambda functions
Update libraries independently of the function code
AWS Lambda executes functions in a Linux-based environment.
This means:
All Python dependencies inside a Lambda layer must be compiled for Linux
Packages built on macOS or Windows will not work
If you build the Pillow library directly on:
macOS → ❌ incompatible
Windows → ❌ incompatible
This is one of the most common Lambda errors developers face.
To ensure compatibility, we build the Pillow library inside a Linux environment — even if we’re developing on macOS or Windows. This is where Docker comes in.
Docker allows us to:
Spin up a Linux container
Install Python dependencies inside it
Package them exactly as Lambda expects
Creating pillow_layer.zip Using Docker
We simply execute a shell script that takes care of everything for us.
./build_pillow_layer.sh
When the script runs, it:
Uses a Linux-based Docker container that matches the AWS Lambda Python runtime
Installs the Pillow library inside that Linux environment
Packages the dependency in the correct Lambda layer folder structure
Creates a
pillow_layer.zipfilePlaces the zip file inside the Terraform directory
The entire process is automated and consistent across all operating systems.
Once the script completes, Terraform simply references the generated file:
filename = "${path.module}/pillow_layer.zip"
Terraform uploads the zip as a Lambda Layer, and the Lambda function consumes it during execution.
Packaging the Lambda Function Code
Terraform uses the archive_file data source to zip the Python Lambda code before deployment.
# Data source for Lambda function zip
data "archive_file" "lambda_zip" {
  type        = "zip"
  source_file = "${path.module}/../lambda/lambda_function.py"
  output_path = "${path.module}/lambda_function.zip"
}
This ensures Terraform redeploys the function only when the code changes.
Creating the Lambda Function
The Lambda function performs the actual image processing.
resource "aws_lambda_function" "image_processor" {
  function_name = local.lambda_function_name
  runtime       = "python3.12"
  timeout       = 60
  memory_size  = 1024
}
Timeout: 60 seconds (well within Lambda limits)
Memory: 1024 MB for faster image processing
Layer: Includes Pillow for image manipulation
Environment Variables: Destination bucket and log level
CloudWatch Logging for Observability
We explicitly create a CloudWatch Log Group to:
Control log retention
Avoid infinite log storage costs
resource "aws_cloudwatch_log_group" "lambda_processor" {
  name              = "/aws/lambda/${local.lambda_function_name}"
  retention_in_days = 7
}
Allowing S3 to Trigger Lambda
Lambda must explicitly allow S3 to invoke it.
resource "aws_lambda_permission" "allow_s3" {
  statement_id  = "AllowExecutionFromS3"
  action        = "lambda:InvokeFunction"
  function_name = aws_lambda_function.image_processor.function_name
  principal     = "s3.amazonaws.com"
  source_arn    = aws_s3_bucket.upload_bucket.arn
}
This ensures secure, controlled invocation.
Configuring S3 Event Notifications
Finally, we connect everything together by configuring S3 to trigger Lambda whenever a new object is created.
resource "aws_s3_bucket_notification" "upload_bucket_notification" {
  bucket = aws_s3_bucket.upload_bucket.id

  lambda_function {
    lambda_function_arn = aws_lambda_function.image_processor.arn
    events              = ["s3:ObjectCreated:*"]
  }

  depends_on = [aws_lambda_permission.allow_s3]
}
The depends_on ensures permissions exist before notifications are applied.
Deploy Project
Now that everything is set up, the final step is to deploy the entire infrastructure using Terraform.
We execute the standard Terraform commands:
terraform init
terraform plan
terraform apply
Terraform then takes over and provisions all the AWS resources we defined, including:
Both S3 buckets (upload and processed)
IAM roles and policies for Lambda
Lambda layer containing Pillow
Lambda function for image processing
CloudWatch log group
S3 event trigger
Once the deployment completes, Terraform outputs useful information, such as the names of the buckets and the Lambda function, making it easy to verify the setup.
Testing and Verification
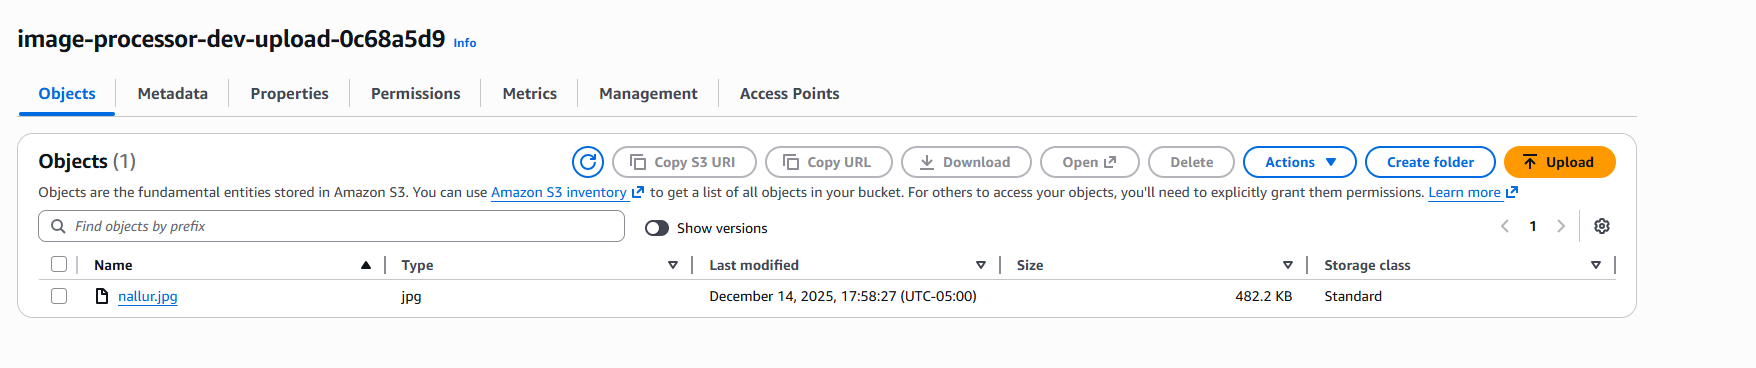
With the infrastructure deployed, we can test the pipeline by uploading an image to the upload bucket.
Supported file types: JPG or JPEG
Upload methods:
AWS Management Console
AWS CLI
Any method that creates an object in the bucket

What Happens Behind the Scenes
When a file is uploaded:
S3 generates an ObjectCreated event
The Lambda function is triggered automatically
The image is processed using Pillow
Multiple processed versions of the image are generated
All processed images are stored in the destination bucket
Logs are written to CloudWatch for monitoring and troubleshooting
This event-driven workflow happens automatically, without any manual intervention.
Conclusion
With that, we’ve successfully completed Day 18 of the 30 Days of Terraform Challenge.
We built a serverless image processing pipeline that leverages:
AWS Lambda for compute
S3 Buckets for storage
CloudWatch for observability
Terraform for automated infrastructure provisioning
This project demonstrates a real-world serverless architecture, combining automation, scalability, and event-driven processing a great example of how modern cloud-native applications are built.